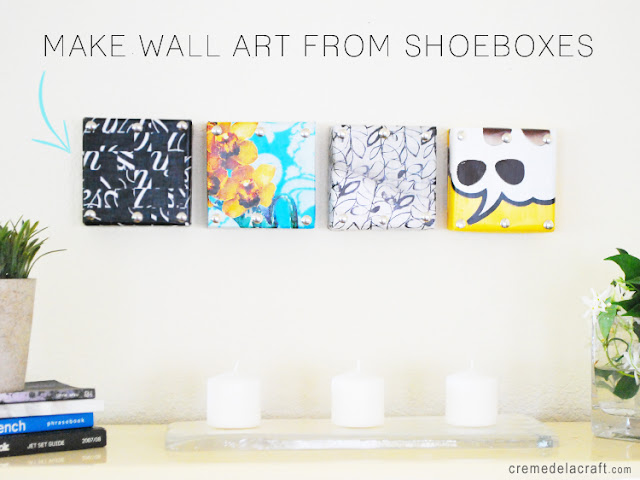
This project is a semi-sequel to the DIY: Shoebox Wall Shelves I posted a few weeks ago. After using all my shoeboxes for that project, I was left with a bunch of shoebox lids and the crafter in me knew I couldn't just throw them out! I realized that shoebox lids are similar in depth to canvas boxes, and so this DIY project emerged! Just cut 'em up, add your favorite decorative paper (or cut out graphics from old magazines like I did) and you've got custom wall art for your home. Imagine an entire wall of these! Follow the steps below to create your very own.
Materials:
• Shoebox lids (1 regular size shoebox lid makes 2 pieces of wall art)
• Decorative paper (I repurposed mine from old magazines and shopping catalogs)
• Scissors (not pictured)
• Ruler
• Pen
• Tape
• Glossy decoupage medium
• Foam brush
• Thumb tacks
Steps:
• Cut two 4" x 4" squares from the corner of the shoebox lid (see image above). Use a ruler and pen to mark before cutting.
• Slide both of the square pieces into each other so that they form a box with four walls. Attach them together by applying tape to the corners.
• Cut your decorative paper so that it is a few inches larger than the box on all sides so that it will cover the box entirely.
• Starting with one side at a time, apply a thin coat of decoupage medium to the box, and lay the paper on top. Make sure there are no air bubbles. Repeat until the entire box is covered with your paper.
• Once completely dry, add a thin coat of decoupage medium on top of the box to give it a glossy, finished look.
• Once dry, punch in the thumb tacks as desired.
Follow along on Facebook and Twitter to keep up with my new DIY projects each week!


Seriously!? This looks amazing! I can't believe these are shoeboxes!
ReplyDeletehttp://www.runningblonde.com
I will definitely be on the look out for shoeboxes! It may be an idea to cover the inside, turn them round and then you can add vases etc for another good look?
ReplyDeleteVery Nice tutorial, and genius! Wow good I Kent a lot of shoeboxes! Thanks so much for sharing have a wondeful day!
ReplyDeleteVery Nice tutorialllll!!!!!!
ReplyDeletehttp://birihalktan.blogspot.com/
This is amazing! Thanks so much for sharing!
ReplyDeleteCute and easy idea! I love how small they are :). Thanks for sharing!
ReplyDeleteLovelye DIY but how did you attach them the wall securely though?
ReplyDeleteHi Mary - Since they are super lightweight, you can use regular thumb takes or nails and you won't have a problem.
ReplyDeleteAwesome blog. Congratulations :) I love all the DIY with shoe boxes XX
ReplyDeleteSorry I'm an idiot about following directions. What's the purpose of cutting the 4x4 pieces off? Thanks! :)
ReplyDeleteNo problem! You can skip that step if you would like to keep the shape of the rectangular lid. Cutting the 4x4 pieces off will create small little cube shapes. Hope that helps!
DeleteIs it possible to cover with fabric? Will the Decoupage hold?
ReplyDeleteI think if your fabric isn't too think, it should hold just fine. Good luck! - Natalie
Deletewhere did u get the floral pattern?
ReplyDeleteHi - I don't recall exactly where that one came from, but I found all these from old magazines and shopping catalogs.
DeleteHi, how do you attach the boxes to the wall? Thanks
ReplyDeleteHi There - I used thumb tacks then hung the boxes on them. Since they are lightweight, thumb tacks will do the trick. You can also use nails.
Delete~ Natalie
Nice wall art made from shoebox! Right now we have lots of shoebox lids stored in the attic. I'm going to try this!
ReplyDeleteLove it much! Been looking for nice wall decor, this is an eye-opener. Might as well try this!:)
ReplyDeleteI needed some ideas for an art project. This is a great idea! & I can hang it on my wall afterwards, too! Thank you so much :)
ReplyDeleteThis is a lovely wall art. Awesome job. I have one query though and I see that you have answered it in your blog that you can put it up on the wall with thumb tacks, but thickness of the box is more than the length of the pins so, how does it hold the box on the wall?
ReplyDeleteHi Niki - The thumb tacks I used were longer than the shoe box. You can also use regular nails and hammer it in. This will also allow you to place slightly heavier items in the box.
DeleteThis comment has been removed by the author.
ReplyDeleteYep, this one was stolen from your site as well. http://www.bestoutofwaste.net/mini-wall-art-made-out-of-a-shoebox/
ReplyDeleteYou could even use wrapping paper, then draw on it with sharpie for a cute monogram print to give as a gift or hang in your bedroom!!! I think I am going to try it!!!
ReplyDelete>>>>>> cambriacambria.blogspot.com <<<<<<<
I love this idea. I have a bunch of shoe boxes in one of my closets. Can't wait to get started.
ReplyDelete