


Materials: Tissue Box — Newspaper Strips — 3 Disposable Cups — Glossy Decoupage Medium — Acrylic Paint — Foam Brush — Optional Add-Ons: 2 Small Cabinet Knobs — Ribbon — Tacky Glue (or E6000 glue for heavier knobs)
• Peel off the clear plastic strip from the inside of the tissue box.
• Apply a coat of decoupage medium with a foam brush, add a newspaper strip on top of it, and add another coat on top of the strip. Repeat until the entire box is covered. • Once dry, paint the entire box with acrylic paint.
• For a decorative touch, attach cabinet knobs with glue (tip: if the knobs are heavy, use rubber bands to hold in place until dry).
• Add ribbon around the box with tacky glue.
• Add ribbon around the box with tacky glue.
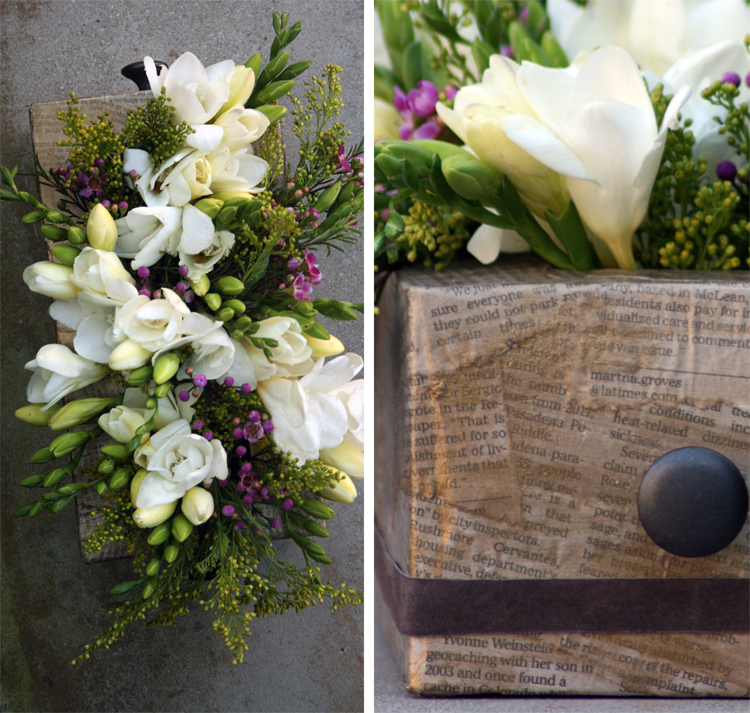
• Insert disposable cups inside the box. You may need to bend them a little, but they should fit snugly inside.
• Add water to the cups and arrange flowers.
Tip: When replacing flowers, first remove flowers then pull out cups one by one and dump out the water. Place cups back into the box to reuse with a new bouquet.
Now, let's see your creations! Join our Facebook community and subscribe here to receive next week's DIY project.
• Add water to the cups and arrange flowers.
Now, let's see your creations! Join our Facebook community and subscribe here to receive next week's DIY project.
Natalie, this blog is amazing! I love how you break everything down into easy-to-follow steps. The photos and the graphical layout are gorgeous. I'm proud of you dude :)
ReplyDeleteThank you! So excited that you liked it!
ReplyDeleteLove it! And what beautiful flowers you used! Just might have to feature this on my Friday links.
ReplyDelete- Angela Marie @ http://sunkissedivory.blogspot.com
What an absolutely amazing idea!! Thanks for sharing. Pinning this!
ReplyDeleteThank you gals! Thanks for stopping by!
ReplyDeleteThis is a beautiful idea. I am going to do it with my group of 3-7 year olds for summer camp. I can't wait to see how they turn out!
ReplyDelete@Sara: How exciting! I taught crafts at a kid's camp once and it was so much fun. I would love to see pictures when you're done :)
ReplyDeleteI loved this flower box from the moment I saw it. When I discovered it was made from tissue boxes, I loved it even more!! Absolutely had to include it with links back to you and this post on my Mother's Day Gift Tutorials post here:
ReplyDeletehttp://freshjuniper.blogspot.com/2012/05/mothers-day-gift-tutorials-25-quick.html
Happy Mother's Day!
Thanks Rebecca! I think the best Mother's Day gifts are always the ones that are handmade :)
ReplyDeleteI LOVE this idea, but I am a bit concerned..when you water the plants, doesn't the box get damaged? What stops the box from getting soaked? Maybe I missed that in the post,
ReplyDeleteHi there! The 3 disposable cups inside the tissue box will keep it dry. When watering the flowers, simply poor water into the cups and add flowers. When you'd like to replace the flowers, first remove the flowers then pull out the cups one by one and dump out the water. Hope that helps and glad you liked the project!
ReplyDelete- Natalie
Thanks Natalie! I Love this idea! I think it would be perfect on the windowsill of my dream office/library! haha I will put it on my "must make" list!
ReplyDeleteI sent you an email btw!
What color acrylic paint did you use here? It's lovely.
ReplyDelete@pearlsmama: I used gold. I loved the way it turned out!
ReplyDeleteSo we did your craft at our neighborhood summer kids camp (Funday Monday) and it turned out beautiful - not quite like the beautiful in the one you pictured but still pretty cute! I put some pics on my blog... www.BrainstormInBloom.blogspot.com
ReplyDeleteThanks for the great idea!
@Sara They turned out beautiful!! I'm so impressed with these kids. Thanks for sharing and I love the raffia you added too! ~ Natalie
ReplyDeletei followed your twitter :)
ReplyDeleteThis was an awesome idea for my eco-club project, Thanks for the idea.
ReplyDelete