


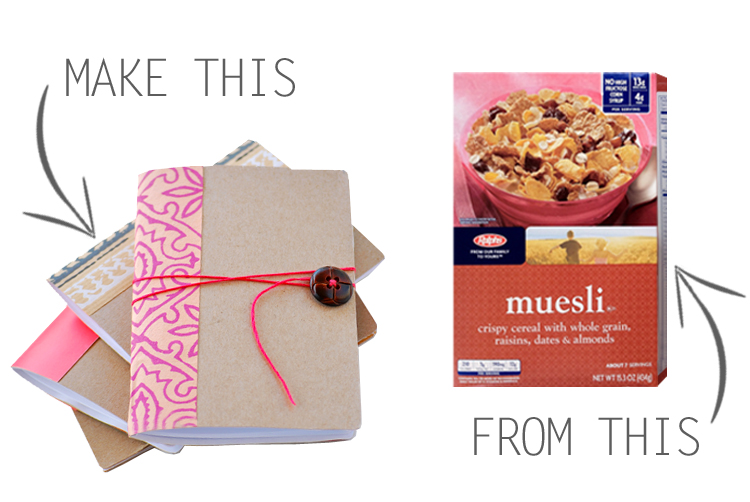
I am still a little old-fashioned when it comes to taking notes and I usually have at least two pocket notebooks in my purse at all times (one for craft ideas and the other for making to do lists). I realized that I am also very picky when it comes to choosing the perfect notebook, and for those of you who are like me, I've got a solution for you!
Follow the directions below to make your own personalized, budget-friendly pocket journal out of cereal boxes inspired by my favorite Moleskine notebooks. Choose your favorite decorative paper and a stylish button to create the perfect notebook that suits your own style. These were so easy and fun to make, I ended up making four...one for me and three for my friends.


Materials:
• Cereal box (1 cereal box makes 2 notebooks. You can also use cardboard, cardstock or gift boxes)
• Paper for the inside pages (I used 20 pieces of 8.5" x 11" computer paper, but you can also use lined or graph paper)
• A piece of decorative paper (to cover the spine)
• Scissors
• Ruler
• Pen
• Glue stick, tape runner or double-sided tape
• Needle and embroidery floss
• Button

Steps:
• Cut out the cereal box to create the cover for your notebook. I cut a 5.5" x 8" piece for mine, but you can make it as small or large as you wish.
• Fold it in half so that the blank side is facing out.
• Run embroidery floss through the needle and sew on the button to the front of the notebook. Leave about 20" of the thread hanging. This will be used to wrap around the notebook to close.
• To cover the images of the cereal box, apply glue or tape to the inside of the notebook (make sure you get the corners!) and place a piece of paper on top to attach. Cut around the edges to remove any excess paper.
• Grab your paper for the inside pages and trim them down so they are slightly smaller than the notebook (about 1/4" shorter on all sides).
• With the needle and embroidery floss, stitch the paper to the notebook down the spine.
• Apply glue or tape to your decorative paper and attach it to the spine of the notebook.
• Optional: For a more finished look, cut rounded corners on all four edges of the notebook.
Follow along on Facebook and Twitter to keep up with my new DIY projects each week!
Oh my God it very beautiful, I really adore it, Thanks for the tutorial, I Will head for the sewing room now!!,
ReplyDeleteThese are divine! I, like you, am always carrying around multiple notebooks but find it hard to always find something that's just right. Problem solved!
ReplyDeleteSo great, need to try it out!
ReplyDeleteHello I found your blog strolling through the net, I've loved, you have very original ideas, I follow. I also transformed my clothes but personal plan, my clothes for myself. I have a blog as it transformed the shoes to give a personal touch, stop if you want and check out. Greetings from PintoZapas.blogspot.com
ReplyDeleteMaking these tomorrow. No joke. I've been a fiend for making mini notebooks lately and I love finding new ways. Thanks for the lovely DIY!
ReplyDeleteThey are so sweet! :)
ReplyDeleteCecilia
This is amazing! I love notebooks too, and I have a cereal box downstairs - it's fate, I may just have a go at making one right this minute...
ReplyDeleteI love your blog! Your tutorials are so creative and original! That's why I awarded you a Liebster Award.
ReplyDeletehttp://cancandancer.blogspot.com/
PS I definitely will be making one of these sketchbooks! And sorry if you actually do have more than 200 followers, I looked at your bloglovin number.
Wow this is such a great idea! Thanks for sharing!!
ReplyDeleteThanks is a great idea. I'm gonna try it with my daughter it will be her summer writing craft
ReplyDeleteThis is just too cute. WIll have to try it! Just shared it with my sister too who's looking for ideas to make a mini journal for a europe trip :)
ReplyDeleteThanks for sharing!
Made these with friends! They turned out great!! Thanks for the idea.
ReplyDeleteGreat idea for teens at a camp we go to. I handle crafts and we are always looking for ways to wncorage creativity and recycle what is normally thrown away!
ReplyDeleteInstead of having to trim the inside paper, why not just cut the cover a little bigger? And you could use yarn scraps as well and cover the inside with decorative paper... Just some thoughts
ReplyDeleteI'm a recycling fanatic and hate just tossing cereal boxes (in the recycle bin of course). What a great way to re-use them. Thanks!
ReplyDeleteFantastic!! Easy to do, great recycling idea and super useful, what more could you ask for?!! Thanks for sharing, I pinned it all!
ReplyDeleteBrilliant indeed!
ReplyDeleteI tried this out using an even simpler method with cardboard box (empty pizza shapes box) and paper and stapled it all together. It took all of two minutes and it's beautiful, recycled and exactly what i wanted. Thanks for the inspiration,
ReplyDeleteLaura xo
www.thecupthief.wordpress.com
I tried this out using an even simpler method with cardboard box (empty pizza shapes box) and paper and stapled it all together. It took all of two minutes and it's beautiful, recycled and exactly what i wanted. Thanks for the inspiration,
ReplyDeleteLaura xo
www.thecupthief.wordpress.com
Hey! We've shared your DIY idea on our Facebook page. Do have a look :) http://www.facebook.com/sashafairtrade
ReplyDeleteAwesome idea!! :) :)
Using this for Adult Craft Night at the library where I work! Thank you!
ReplyDeleteSo nice of you to share this, I too like you need to have a handy notebook with me at all times. My children tease me about it and say I'm old school but when I misplace the note books I am out only a few cents, they on the other hand are out many dollars and half of their life history.I am making one for each of them.
ReplyDeleteI was looking for a way to recycle cereal boxes, this is perfect for me and my kiddos!!
ReplyDeletecomo conseguir traduzir essa pagina para portugues brasil
ReplyDeleteÉ só usar o tradutor de página do google.
DeleteLove!! Can't wait to make this!
ReplyDeleteThanks for sharing this great Idea. Can´t wait to do this!
ReplyDeleteoh my gosh...
ReplyDeletei just discovered this
somewhere...maybe tumblr
and i LOVE this project.
its perfect for art students
for making their own journal!
thank you! thank you!
discovered this via pinterest...superb photos and a great project!
ReplyDeleteTHANK YOU for the inspiration!!
discovered this via pinterest...superb photos and a great project!
ReplyDeleteTHANK YOU for the inspiration!!
TEMGO QUE HACERLAS ME ENCANTARON!!!!!!!
ReplyDeleteLO ENCUENTRO UN POCO DURO PARA COSER PERO SON PRECIOAS.
SALUDITOS
Hi I'm 14 and I'm French. I've just looked at your website and I'm just in love with it ! I've make this notebook there's few minutes what do you think ?
ReplyDelete[IMG]http://i48.tinypic.com/24weqz6.jpg[/IMG][IMG]http://i46.tinypic.com/2ccl850.jpg[/IMG]
Hi Laeti! This looks so AMAZING! It turned out beautifully and I love the paper you chose. Nice job! Thanks so much for sharing. It made my day :)
Delete- Natalie
http://i46.tinypic.com/2ccl850.jpg
ReplyDeletehttp://oi48.tinypic.com/24weqz6.jpg
Where did you find your craft paper? My local Joanns and Michaels never has anything cute like that.
ReplyDeleteHi Kimberly - I actually got them from Michaels many years ago. They were small pieces of paper in a packet. The brownish one is actually a piece of wrapping paper. You can also take a look in magazines, which can also have images with interesting patterns. Good luck!
Delete- Natalie
I love a lot this blog. Please visit my blog: unafabricamaravillosa.blogspot.com.es
ReplyDeleteYou could also use a wider decorative washi tape to cover the spine!
ReplyDeleteLove this, hanks for posting it up! :D
Thanks*
ReplyDeleteI linked to this project on my blog (http://reclaimedcraftsnorthampton.blogspot.com/2013/02/collegiate-bike-racing.html), thanks for the great idea!
ReplyDeletewhy did i throw away my cereal box ..am goin to emptu anther one now now now.thanks for the inspiration
ReplyDeleteso easy to make!
ReplyDeletethanks for share.. it's very useful ^^! love it
Hi Natalie, ages ago I saw a couple of your pictures on Pinterest but at the time I wasn't into pining, didn't really know how it worked... Stupidly, I saved the pictures on my computer in my "to do" folder, but not the link... September last year I actually had a go at making the pads, but then I couldn't find the tutorial anywhere!
ReplyDeleteI tried it anyway and wrote a post on my blog mentioning I couldn't find the original... Yesterday I saw the pictures on Pinterest again and thankfully was brought here!
I absolutely LOVE your blog! I hope you don't mind I used two pictures of yours on mine, I just updated the post linking to this page and I wanted to invite you to write a guest post for my blog if you have a chance. Here is the link to your featured tutorial =)
http://www.mangoandpassionfruit.com/2012/09/little-notepads-out-of-cereal-boxes.html
Thanks for this and your other super cute DIY ideas! xx Z
Hi Zaira - I appreciate you linking back to my post and I'm really glad you tried out the project! Yours turned out great too! Love the paper you used. Thanks again and hope to see more of your projects :)
Delete- Natalie
Love these cute little notebooks. I posted your link and a photo as a Mother's Day gift on my blog. Hope you don't mind.
ReplyDeleteThank you for sharing! I scooped your post on
ReplyDeleteCrafty Crafts
These are adorable! Definitely doing this craft project over half term ^_^ love this idea, never would've thought of it! Thanks for the inspiration xx
ReplyDeleteWow! This is really a very creative work of art. Thank you for sharing this. Awesome and perfect for the kids. We also did a Cereal Box Guitar out of the same materials you used. You should check this out!
ReplyDeleteEarlyLearning.Momtrusted.com DIY Musical Instruments: Cereal Box Guitar
Wow! This is really a very creative work of art. Thank you for sharing this. Awesome and perfect for the kids. We also did a Cereal Box Guitar out of the same materials you used. You should check this out!
ReplyDeleteEarlyLearning.Momtrusted.com DIY Musical Instruments: Cereal Box Guitar
How did you keep the edges of the inside paper (and the cardboard, I suppose) straight and smooth? Using regular scissors I could only manage to get raggedy, slanted pages. Do I just have bad scissors or is there some trick to it? Also, do I glue the binding paper while the journal is folded or open? Gluing it folded caused it to wrinkle when I open it.
ReplyDeleteThanks for your help! Definitely will have to try this again!
Hi Sam! To get the paper straighter, you can either use a paper trimmer (found online or craft stores) or a ruler with an x-acto knife. For the binding, I glued it while it was folded. If you do it while it is open, the notebook won't close properly. After gluing, try placing it under something heavy until it is dry. That may help with the wrinkling. Let me know if you have any more questions!
DeleteBest, Natalie
I have tried it, amazing and simple!! Big thanks! :)
ReplyDeletehttp://pictopictu.blgospot.cz/
Hi there,
ReplyDeleteI am trying this today - it looks so cute! One question I have is how did you stitch the book together? It is extremely hard to get the needle through all the paper and the cardboard and I'm wondering if you did it differently? Any tips? Thanks so much!
Hi Kelly! Try stitching a few pages at a time. I didn't use that many sheets of paper, which made it a little easier. Also, I used the table to help push the needle through the paper. Hope that helps and let me know if you have any other questions!
Delete- Natalie
Thanks! I'll try that. I used about 10 sheets of paper and ended up pre-"punching" the cardboard with the needle and that helped quite a bit too. It turned out so cute and my mom loved it! Thanks for the great post!
Deletenice and cool
ReplyDeleteI absolutely love the idea! I use notebooks to take notes too, mostly because I tend to forget things so easily, but I enjoy taking notes as well.
ReplyDeleteThank you so much for sharing it, I love to make my own journals and notebooks, but I've never used cereal boxes. I'll try for sure :D
Also, the colors of the paper you used to cover the spines are amazing :)
I love your blog, so I'm not a follower and a fan :3 I run a little blog with my ideas... Any advice you could give me? :$
My Blog :)
OMG!!!
ReplyDeleteThis is going to be sooooooo cool!!!!!!!!!!!!
ReplyDeleteHi Natalie,
ReplyDeleteI'm Renee Metzler from Total Home Makeover (http://totalhomemakeover.com & http://totalhomemakeover.webs.com). I love this tutorial! Do I have your permission to feature this tutorial in my upcoming magazine with full credits to you? Please let me know at my email: nrmetzler@windstream.net. (I apologize for contacting you through comments; buy your contact page didn't work for me.) I look forward to hearing from you.
Warmly, Renee
nrmetzler@windstream.net
that's both cool and great!
ReplyDeleteI linked to your tutorial on my blog - thanks for sharing!
♥, doro von Hand zu Hand
cool. i actually prefer the cereal print on the outside!
ReplyDeleteMade one today, and it turned out beautiful. Thank you!
ReplyDeleteAwesome!! Thanks for sharing, Lea!
DeleteHey! "Muesli!" That's the brand I eat!!!
ReplyDeletegreat idea
ReplyDeleteWow!!!!! Such a tremendous tip !!!!! Worth reading it !!!!~!!!!!
ReplyDeletePlease make an option for signup
This is such a cute idea! I did this recently with Kraft Paper makes for a great gift.
ReplyDeleteLove these! Have Pinned and Stumbled :)
ReplyDeleteu can also use a part of a shoe box u get when u buy a new pair of shoes, it works perfectly!
ReplyDeleteyou are amazing, keep creating loved it!
ReplyDeleteI made it and is pretty awesome! I can't wait to give it like a gift for some friends =D
ReplyDeleteThank you for sharing these fab notebooks! We have added a link to this post on our Operation Christmas Child Roma & Maranoa Facebook page - aiming to fill 1,000 shoeboxes this year! Hopefully each of our boxes can go with a handmade notebook... :) Peace, G. oxo
ReplyDeleteLove this tutorial! Thank you so much for sharing this with us.
ReplyDeleteI have linked to this tutorial on my blog. I hope that's alright. If not, please let me know and I'll take it down immediately.
https://ultimateheroshandbook.wordpress.com/2015/03/31/your-hero-montage-or-how-to-create-your-own-adventure-journal/
wow! cool idea! I made them with washi tape instead of paper for the spine and looks great! awesome idea for up-cycling!
ReplyDeleteawesome idea! I have to make them :) very good tutorial thanks for sharing!
ReplyDeletevery nice idea loved it
ReplyDeletevery nice idea!loved it
ReplyDeletethanks for this idea:D
great idea!I have made this mini pocket notebook and everybody loved it in my house and me too! Nice idea for recycling things and thanks for sharing such a nice idea with us:D:)
ReplyDeleteGood for children to make for mother's day gift, Christmas or birthday. It will give the children ideas and be creative
ReplyDeleteThis DIY is so cute OMG! I'll try it out later, but thanks for it. <3
ReplyDeleteI'm so young I'm not aloud to share my age but I love doing crafts. And I made one and me and my family will be making them for my sleep over. My point is I love them so much I want to eat lots of ceareal !!!😺
ReplyDelete